Multi-Factor (MFA)
Multi-factor authentication (MFA) is a multi-step account authentication which requires to user to enter more than only the password. It is highly recommended to use MFA or Passkeys to make your user accounts more secure.
ZITADEL supports two different Methods:
- Time-based one time password (TOTP), which are Authenticator apps like Google/Microsoft Authenticator, Authy, etc
- Universal Second Factor (U2F), which is authentication with your device like Windows Hello, Apple FaceID, Fingerprint, FIDO2 keys, Yubikey, etc.
TOTP Registration
Flow
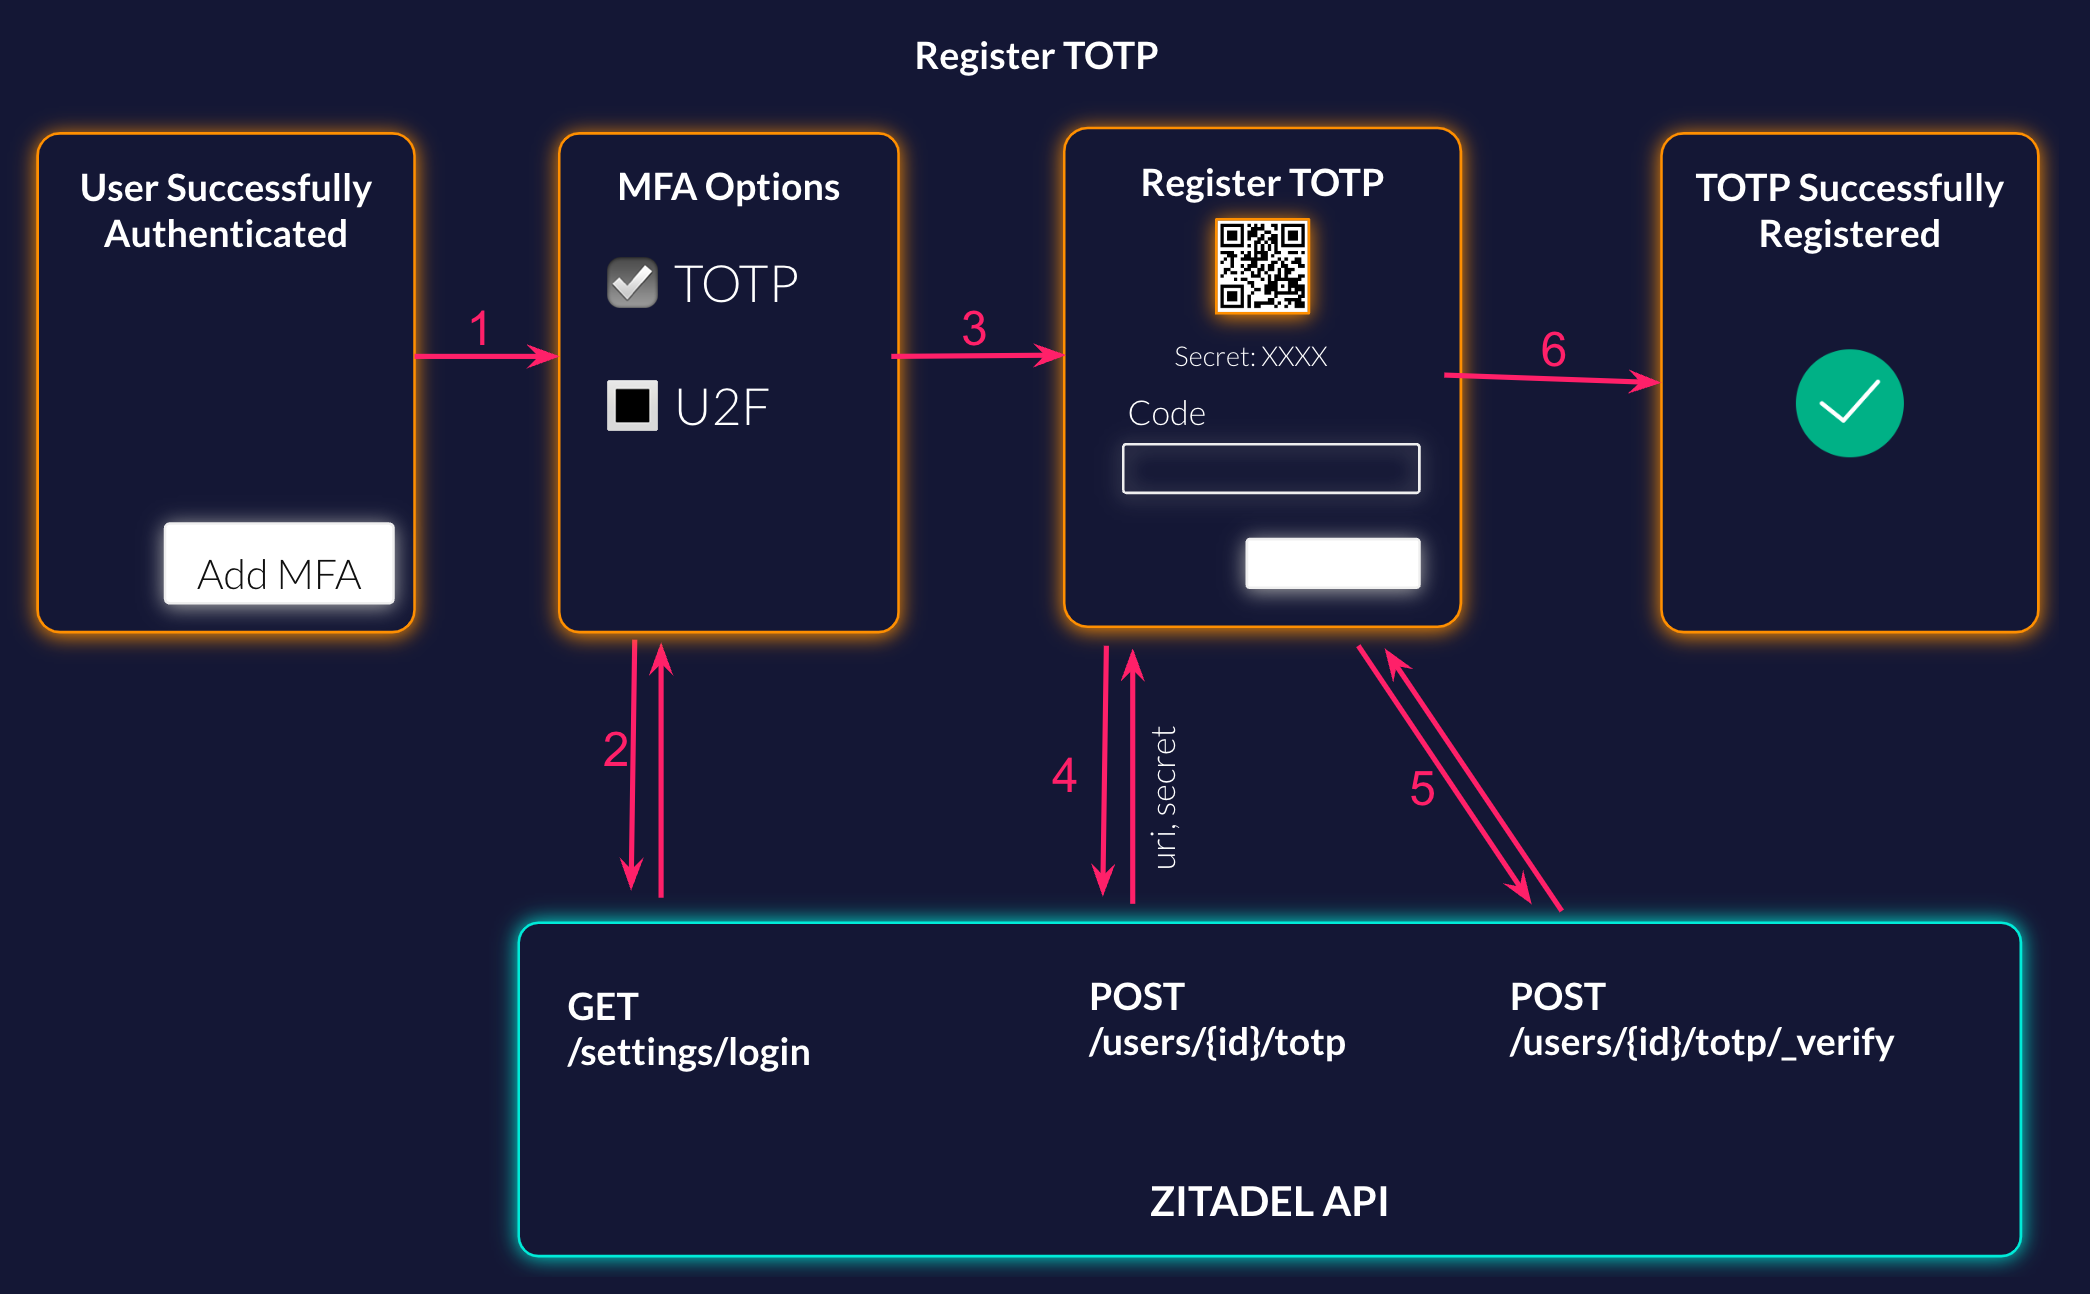
List the Possible Methods
Your user has successfully authenticated, and now you ask him if he wants to setup MFA to have a more secure account. When he starts the configuration, first you want him to show the possible methods. You can either list it implicitly or call the settings service from ZITADEL to get what is configured on the login settings.
More detailed information about the API: Get Login Settings Documentation
Request Example:
curl --request GET \
  --url https://$ZITADEL_DOMAIN/v2alpha/settings/login \
  --header 'Accept: application/json' \
  --header 'Authorization: Bearer '"$TOKEN"''
Response Example: The relevant part for the list is the second factor and multi factor list.
{
    "details": {
        "sequence": "293",
        "changeDate": "2023-03-29T14:16:55.570482Z",
        "resourceOwner": "163840776835432705"
    },
    "settings": {
        "allowUsernamePassword": true,
        "allowRegister": true,
        "allowExternalIdp": true,
        "passkeysType": "PASSKEYS_TYPE_ALLOWED",
        "passwordCheckLifetime": "864000s",
        "externalLoginCheckLifetime": "864000s",
        "mfaInitSkipLifetime": "2592000s",
        "secondFactorCheckLifetime": "64800s",
        "multiFactorCheckLifetime": "43200s",
        "secondFactors": [
            "SECOND_FACTOR_TYPE_OTP",
            "SECOND_FACTOR_TYPE_U2F"
        ],
        "multiFactors": [
            "MULTI_FACTOR_TYPE_U2F_WITH_VERIFICATION"
        ],
        "resourceOwnerType": "RESOURCE_OWNER_TYPE_ORG"
    }
}
Start TOTP Registration
The user has selected to setup Time-based One-Time-Password (TOTP). To show the user the QR to register TOTP with his Authenticator App like Google/Microsoft Authenticator or Authy you have to start the registration on the ZITADEL API. Generate the QR Code with the URI from the response. For users that do not have a QR Code reader make sure to also show the secret, to enable manual configuration.
More detailed information about the API: Start TOTP Registration Documentation
Request Example:
curl --request POST \
    --url https://$ZITADEL_DOMAIN/v2alpha/users/$USER_ID/totp \
    --header 'Accept: application/json' \
    --header 'Authorization: Bearer '"$TOKEN"''
    --header 'Content-Type: application/json' \
    --data '{}'
Response Example:
{
  "details": {
    "sequence": "2",
    "changeDate": "2023-06-28",
    "resourceOwner": "69629023906488334"
  },
  "uri": "otpauth://totp/ZITADEL:minni-mouse@mouse.com?algorithm=SHA1&digits=6&issuer=ZITADEL&period=30&secret=TJOPWSDYILLHXFV4MLKNNJOWFG7VSDCK",
  "secret": "TJOPWSDYILLHXFV4MLKNNJOWFG7VSDCK"
}
Verify TOTP Registration
When the user has added the account to his authenticator app, he has to enter the code from the App to finish the registration. This code has to be sent to the verify endpoint in ZITADEL.
More detailed information about the API: Verify TOTP Documentation
Request Example:
curl --request POST \
  --url https://$ZITADEL_DOMAIN/v2alpha/users/$USER_ID/totp/_verify \
  --header 'Accept: application/json' \
  --header 'Authorization: Bearer '"$TOKEN"''
  --header 'Content-Type: application/json' \
  --data '{
  "code": "123456"
}'
U2F Registration
Flow

List the Possible Methods
Your user has successfully authenticated, and now you ask him if he wants to setup MFA to have a more secure account. When he starts the configuration, first you want him to show the possible methods. You can either list it implicitly or call the settings service from ZITADEL to get what is configured on the login settings.
More detailed information about the API: Get Login Settings Documentation
Request Example:
curl --request GET \
  --url https://$ZITADEL_DOMAIN/v2alpha/settings/login \
  --header 'Accept: application/json' \
  --header 'Authorization: Bearer '"$TOKEN"''
Response Example: The relevant part for the list is the second factor and multi factor list.
{
    "details": {
        "sequence": "293",
        "changeDate": "2023-03-29T14:16:55.570482Z",
        "resourceOwner": "163840776835432705"
    },
    "settings": {
        "allowUsernamePassword": true,
        "allowRegister": true,
        "allowExternalIdp": true,
        "passkeysType": "PASSKEYS_TYPE_ALLOWED",
        "passwordCheckLifetime": "864000s",
        "externalLoginCheckLifetime": "864000s",
        "mfaInitSkipLifetime": "2592000s",
        "secondFactorCheckLifetime": "64800s",
        "multiFactorCheckLifetime": "43200s",
        "secondFactors": [
            "SECOND_FACTOR_TYPE_OTP",
            "SECOND_FACTOR_TYPE_U2F"
        ],
        "multiFactors": [
            "MULTI_FACTOR_TYPE_U2F_WITH_VERIFICATION"
        ],
        "resourceOwnerType": "RESOURCE_OWNER_TYPE_ORG"
    }
}
Start U2F Registration
The user has selected to setup Universal Second Factor (U2F). To be able to authenticate in the browser you have to start the u2f registration within ZITADEL.
More detailed information about the API: Start U2F Registration Documentation
Request Example:
curl --request POST \
  --url https://$ZITADEL_DOMAIN/v2alpha/users/$USER_ID/u2f \
  --header 'Accept: application/json' \
  --header 'Authorization: Bearer '"$TOKEN"''
  --header 'Content-Type: application/json' \
  --data '{
    "domain": "acme.com"
  }'
Response Example:
{
  "details": {
    "sequence": "2",
    "changeDate": "2023-07-03",
    "resourceOwner": "69629023906488334"
  },
  "u2fId": "163840776835432705",
  "publicKeyCredentialCreationOptions": {
    "publicKey": {
      "attestation": "none",
      "authenticatorSelection": {
        "userVerification": "required"
      },
      "challenge": "XaMYwWOZ5hj6pwtwJJlpcI-ExkO5TxevBMG4R8DoKQQ",
      "excludeCredentials": [
        {
          "id": "tVp1QfYhT8DkyEHVrv7blnpAo2YJzbZgZNBf7zPs6CI",
          "type": "public-key"
        }
      ],
      "pubKeyCredParams": [
        {
          "alg": -7,
          "type": "public-key"
        }
      ],
      "rp": {
        "id": "localhost",
        "name": "ZITADEL"
      },
      "timeout": 300000,
      "user": {
        "displayName": "Minie Mouse",
        "id": "MjE1NTk4MDAwNDY0OTk4OTQw",
        "name": "minie-mouse"
      }
    }
  }
}
Register new U2F on current device
Now that you have started the registration within ZITADEL, you have to register the credentials in the browser. This requires a call to the browser api and looks something like the following. Make sure to send the public key credential creation options you got in the previous request from ZITADEL.
const credential = await navigator.credentials.create({
    publicKey: publicKeyCredentialCreationOptions
});
For more information about WebAuthN and registering credential flow, read the following guide: Registering a WebAuthN Credentials
Verify U2F Registration
In the next request you have to verify the U2F within ZITADEL. Include the public key credential you got from the browser in your request. You can give the U2F a name, which makes it easier for the user to identify the registered authentication methods. Example: Google Pixel, iCloud Keychain, Yubikey, etc
More detailed information about the API: Verify U2F Documentation
Example Request:
curl --request POST \
  --url https://$ZITADEL_DOMAIN/v2alpha/users/$USER_ID/u2f/$PASSKEY_ID \
  --header 'Accept: application/json' \
  --header 'Authorization: Bearer '"$TOKEN"''\
  --header 'Content-Type: application/json' \
  --data '{
  "publicKeyCredential": {
    "type": "public-key",
    "id": "pawVarF4xPxLFmfCnRkwXWeTrKGzabcAi92LEI1WC00",
    "rawId": "pawVarF4xPxLFmfCnRkwXWeTrKGzabcAi92LEI1WC00",
    "response": {
      "attestationObject": "o2NmbXRmcGFja2VkZ2F0dFN0bXSiY2FsZyZjc2lnWEcwRQIgRKS3VpeE9tfExXRzkoUKnG4rQWPvtSSt4YtDGgTx32oCIQDPey-2YJ4uIg-QCM4jj6aE2U3tgMFM_RP7Efx6xRu3JGhhdXRoRGF0YVikSZYN5YgOjGh0NBcPZHZgW4_krrmihjLHmVzzuoMdl2NFAAAAADju76085Yhmlt1CEOHkwLQAIKWsFWqxeMT8SxZnwp0ZMF1nk6yhs2m3AIvdixCNVgtNpQECAyYgASFYIMGUDSP2FAQn2MIfPMy7cyB_Y30VqixVgGULTBtFjfRiIlggjUGfQo3_-CrMmH3S-ZQkFKWKnNBQEAMkFtG-9A4zqW0",
      "clientDataJSON": "eyJ0eXBlIjoid2ViYXV0aG4uY3JlYXRlIiwiY2hhbGxlbmdlIjoiQlhXdHh0WGxJeFZZa0pHT1dVaUVmM25zby02aXZKdWw2YmNmWHdMVlFIayIsIm9yaWdpbiI6Imh0dHBzOi8vbG9jYWxob3N0OjgwODAifQ"
    }
  },
  "tokenName": "Google Pixel"
}'
You have successfully registered a new U2F to the user.